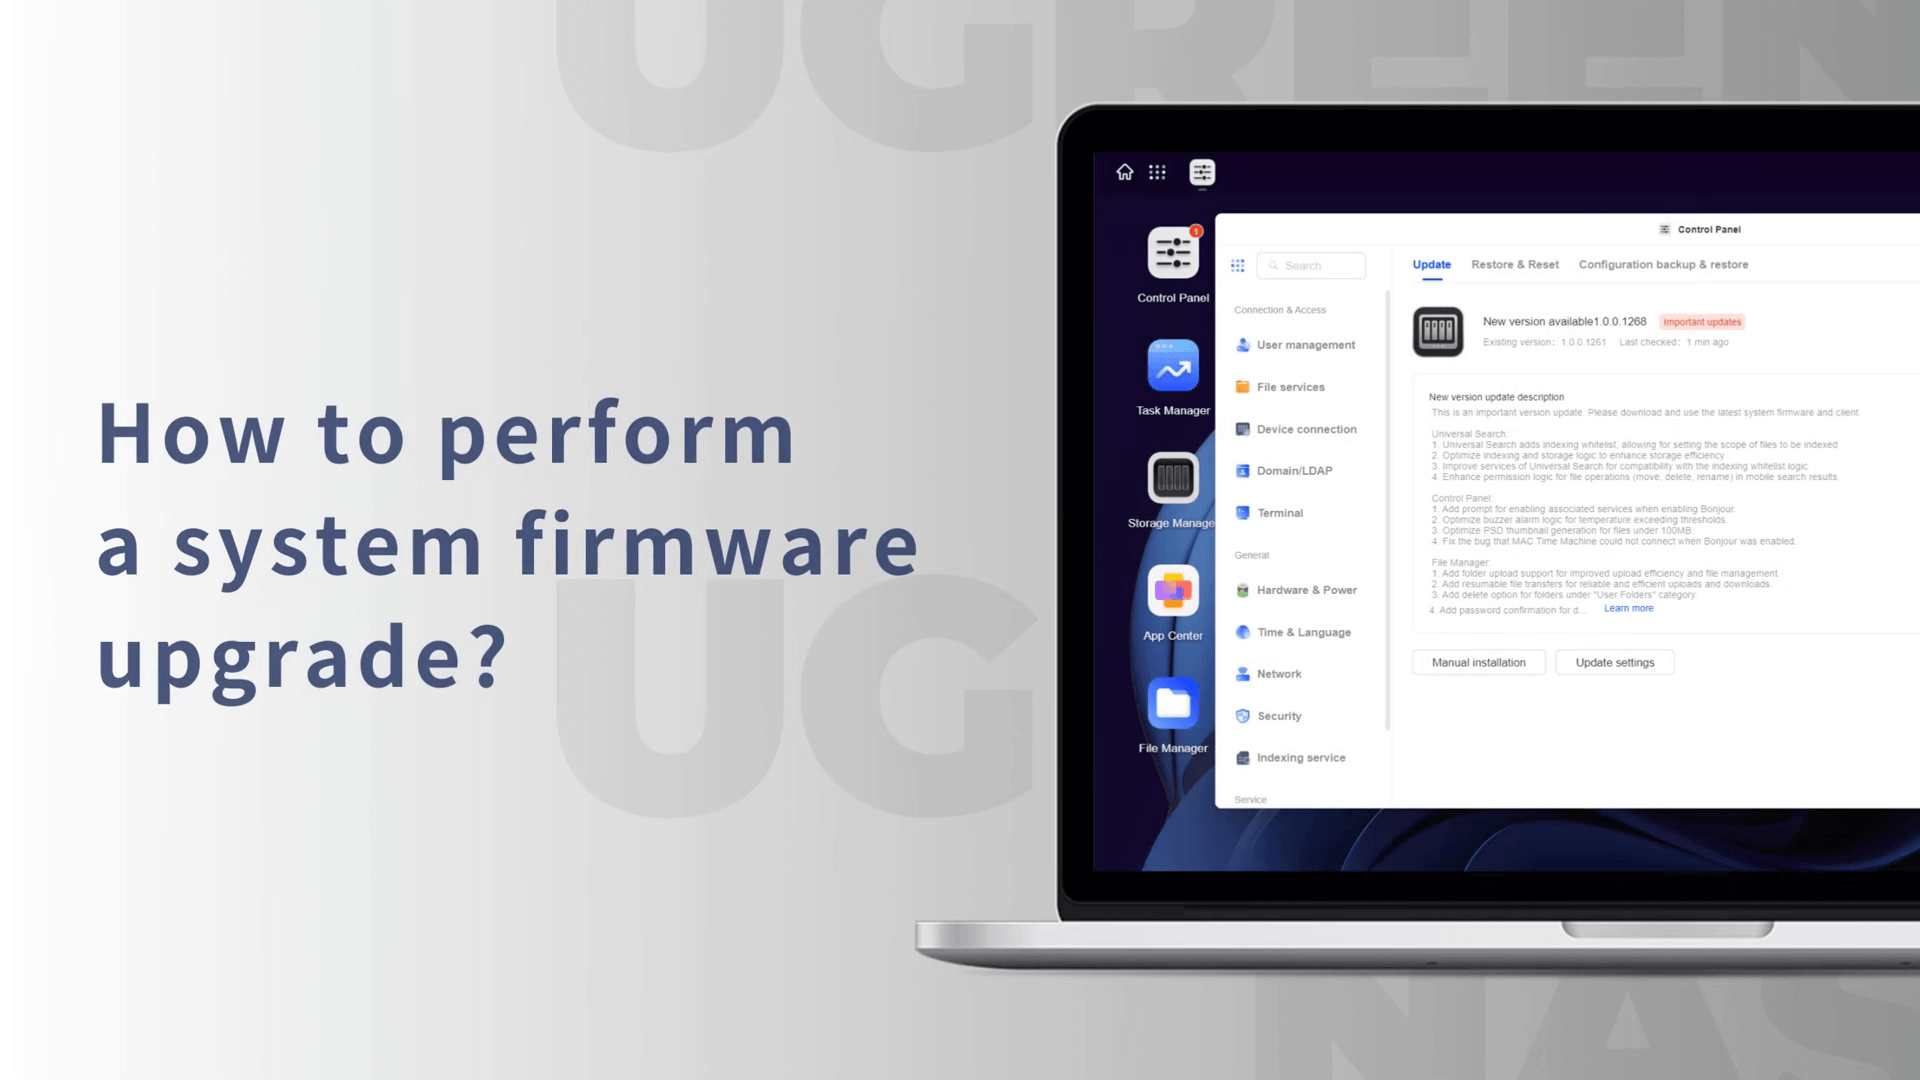
Due to the outdated system version, it is essential to backup important data before upgrading.
|
|
Time to read 6 min
To access the best experience, please complete the system and application updates . You can access NASync via multiple platforms, including Windows, MacOS, Android, iOS, TV and web.
Download the latest upgrade package from our official website for local installation.
Click here for connection and update instructions.
Contact us if any issues arise during the upgrade process, we will assist you in resolving them.
If your device has been using the SSD Cache feature consistently on the old version, we recommend removing SSD Cache before upgrading. After the upgrade, you can recreate the SSD Cache.
Due to the outdated system version, it is essential to backup important data before upgrading.
①SSD Silicone Pad x 2 ②User Manual x 1 ③Warranty Card x 1 ④Power Adapter x 1 ⑤Screws & Screwdriver ⑥Hard Drive Tray Key x 2 ⑦ NAS Main Unit x 1 ⑧Ethernet Cable x 2
Note:
1. Screws and screwdriver are for installing a 2.5-inch hard drive and M.2 hard disk.
2. Do NOT plug in or unplug hard drives (including M.2 SSDs) or RAM memory or while NASync devices are on.
3. Before disassembly or assembly, please ensure the device is turned off.
4. Depending on the model, the power adapter may vary.
Before using the product for the first time, it is necessary to install relevant hard drives, connect to the network, register an account, and bind (connect) NASync devices to a mobile phone, PC, tablet, or laptop.(Video Tutorial)
1.Use the drive tray key to unlock the drive tray by inserting it into the lock hole and turning right. Press the button as the image shown below and pull out the drive tray.
2. Press on the "press" button on the back side of the drive tray and gently extend the clamp outwards. Place the hard drive into the tray. Push the clamp back , locking the hard drive into place.
3. Insert the loaded drive tray back and push it till the end. Press on the lever to secure the tray into place. Repeat this step for each drive that will be installed.
4. Using the hard disk lock key, lock the tray again by turning left.
1.Use the drive tray key to unlock the drive tray by inserting it into the lock hole and turning right. Press the button as the image shown below and pull out the drive tray.
2.On the right side of the drive tray, remove the screw at the end of the tray. Safekeep this screw as it can be reinstalled if you want to replace the 2.5-inch drive with a 3.5-inch one later on.
3. Flip the tray to its back and align the four empty screw spaces at the bottom of the 2.5-inch hard drive with the screw holes on the tray. Tighten the screws to fasten hard drive to tray.
4. Insert the loaded drive tray back and push it till the end. Press on the lever to secure the tray into place.
5. Using the hard disk lock key, lock the tray again by turning left.
A RAM stick, is used to accelerate system response capability . The RAM slot is located at the bottom of the device. Before installation, ensure the device is powered off.
1. Using a screwdriver, remove the screws of the bottom expansion compartment panel and remove the panel. You will be then able to see the RAM module slot.
2. Insert the RAM stick into the slot at an angle. Be sure to align the notch in the middle with the notch on the slot. Press into the slot lightly ensuring that the gold connectors are fully inserted into the slot and no longer visible. There will be a slight "clicking" sound as the RAM stick locks into place.
3. Replace the panel and tighten screws again, power on the device, then wait for LED lights on the front of the NASync device to flash white, indicating it is operating normally.
M.2 hard disk
With M.2 hard disks used as read-write caches, the random data read and write performance of NASync devices is considerably improved. The M.2 hard drive slots are located at the bottom of the device. The M.2 slots of model DXP2800 are located at the left inside the main unit. Before installation, ensure the device is powered off.
1. Using a screwdriver, loosen the screws of the bottom expansion compartment panel and remove the panel. You will then be able to see the RAM slot and two M.2 hard drive slots.
2. Using a screwdriver, loosen the M.2 fixing screw. Align the M.2 hard drive connectors with the slot bay, then insert the drive into the slot at a slight angle. Tighten the screws.
3. To add thermal silica gel to the M.2 drive, peel off the plastic film on the front and back of the thermal gel, then stick it to the M.2 drive.
4. Replace the panel and tighten the screws again, power on the device, then wait for LED lights on the front of the NASync device to flash white, indicating it is operating normally. Go to the "UGREEN NAS" app to set up the SSD cache.
Note: Before removing the M.2 hard drive, please go to the "UGREEN NAS" app to remove the SSD cache. This will prevent the drive from being used as a cache. If you remove the drive without completing the removal procedure, data may be lost.
A network connection is how NASync devices connect to other devices and allow for data transfers between authorized users. A network connection is necessary in order to connect to, and communicate with, NASync devices and users.
1. Connect to the power supply brick provided to the power port at the rear of the NASync device and to the power outlet or surge protector. Press the power button and LED lights at the front of the device will turn white to indicate the device is powering on.
2. Once the device is powered on, connect it to the Internet by connecting a LAN cable to the NAS device and your router (NASync devices are not able to connect via WiFi).
Note: It is recommended to use a router for first-time connection and binding. This connection will provide a more stable network environment for the NASync device.
1.Download the Ugreen NAS App
Please go to the Ugreen Official Website > Download Center to download and install the "UGREEN NAS" App.
2. Add a device
Ensure the NASync device and your mobile phone (or tablet) are on the same LAN network, then open the "UGREEN NAS" App. The App will automatically search for and display available NASync devices on the same LAN network. You can also add a device by scanning the QR code on the bottom of the device. Select the device you want to add, click "Register", and your NAS device will be added successfully.
3. Register account
After adding the NASync device, you will be directed to the device initialization interface. Please complete the following steps:
① Give the device a name that is easy to identify and manage.
② Register a local administrator account for the device to manage it.Note: If the device does not undergo the initialization process, its status will be displayed as "Not Initialized".
2. Register account
After adding the device, you will enter the initialization device interface. Please complete the following operations:
① Give the device a name and register a local administrator account for the device to manage it.
② Register and bind a Ugreen account. This is an optional step if you want to use additional functions like UGREEN Link and quick login. If you don’t believe you need it, you can skip this step.
③ Finally, select "Automatically install important updates only" (required) and "Device Analysis Improvement Plan" option (optional), and then you can start using the device.
3. Download Ugreen NAS App/Client
Go to the Ugreen Official Website > Download Center to download and install the "UGREEN NAS"App/Client, then log into your account again to use it.
For more information on product usage, helpful tips, comprehensive guides, and other relevant content, please visit Video Center .