How to Migrate Data to a New NAS Storage System
Ever felt like your old NAS is bursting at the seams, or maybe you're envisioning a smarter solution like AI NAS, where neural networks handle 90% of your data categorization tasks automatically? Migrating your data to a new NAS (Network Attached Storage) system can feel like a big task, but it’s often necessary—whether you’re upgrading for more space, consolidating your storage, or switching to a different brand. The good news? It doesn’t have to be overwhelming. With the right steps, you can move your files smoothly and keep everything organized.

Key Takeaways:
- Migrating data to a new NAS involves backing up files, ensuring compatibility, and properly setting up the new system.
- Transfer methods include network transfer (convenient for smaller data), direct drive connection (fastest for large data), and cloud syncing (ideal for remote setups).
- Preserve your data integrity by using tools like checksums, and maintain folder structure and permissions using tools like rsync.
- Common migration issues include slow speeds, incomplete transfers, permission errors, compatibility problems, and network instability—all solvable with basic troubleshooting steps.
- After migration, always verify files, configure user accounts and permissions, and securely manage or dispose of your old NAS system.
Preparing for a Smooth Migration
Before you start moving your files to a new NAS (Network Attached Storage) system, a little prep work goes a long way.By taking a few simple steps, you can avoid problems and keep your data safe. Here’s what you need to do to set yourself up for a smooth migration.
Backing Up Your Data
First, make a backup of your files. This is super important because if something goes wrong, you won’t lose your precious photos, videos, or documents. It’s like having a spare key—if the migration hits a snag, you’ve got a safety net. You can copy everything to an external hard drive or upload it to a cloud service like Google Drive or Dropbox. If you’re unsure which method fits best, this overview of the top 2025 data backup strategies can help you weigh your options and back up with confidence. It might take some time, but it’s worth it to know your stuff is secure.

Checking Compatibility and Requirements
Next, check if your new NAS can handle your old data. Think of it like making sure your new phone can open your old pictures—sometimes the formats don’t match up. Grab the manual or visit the new NAS’s website to see if it supports the same types of files and folder setups as your old system. If not, you might need to tweak some settings. Don’t stress—it’s usually pretty easy to figure out.
Setting Up the New NAS
Finally, get your new NAS ready to roll. This is like setting up a new TV: plug it in, connect it to your network, and make sure it’s up to date. Hook it up with a cable or Wi-Fi, then check for software updates and install them. This gets your NAS in top shape to take on your files.
By doing these three things—backing up your data, checking compatibility, and setting up your new NAS—you’ll be all set for a smooth migration. It’s a little effort now that saves a lot of hassle later.
Choosing the Right Transfer Method
Moving your files to a new NAS (Network Attached Storage) system is like planning a road trip—you need to pick the best route for your journey. There are a few ways to transfer your data, each with its own pros and cons. The right choice depends on how much data you have, how fast you need it done, and how comfortable you are with tech. Let’s explore the main options: network transfer, direct drive connection, and cloud syncing. By the end, you’ll know which method fits your needs.
Network Transfer: Over the Internet or Local Network
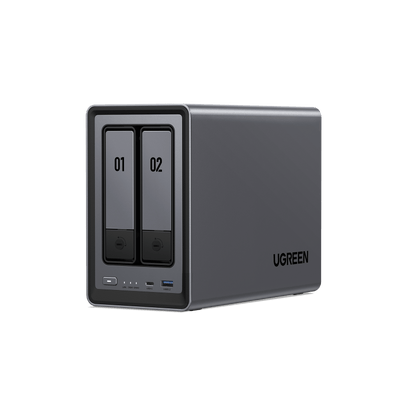
Network transfer is like sending your files on a long drive through your home’s Wi-Fi or internet. It’s the most common method because it’s easy—just connect both NAS systems to the same network and copy the files over. You can use tools like rsync (a popular file-copying program) or your NAS’s built-in software to help. For small amounts of data, like 100GB of family photos, this works great if you have a fast network. But for big transfers, like 10TB of business files, it can take days or even weeks. If your internet is slow, this might not be the best choice. A NAS device like the UGREEN DXP2800 NAS storage can significantly improve efficiency. Equipped with a 2.5GbE network interface, it enables seamless multitasking—allowing you to run multiple applications at once—and can transfer 1GB of data in just 3 seconds.
{{UGPRODUCT}}
Direct Drive Connection: Physically Moving the Drives
Direct drive connection is like taking a shortcut by moving the hard drives from your old NAS to the new one. It’s faster than network transfer because you’re not waiting for files to copy over the internet. But there’s a catch: you need to make sure the drives work with your new NAS. Some NAS systems are picky about drive types, so check the manual first. If you’re comfortable opening up your NAS and swapping drives, this can save a lot of time. It’s perfect for large data sets, like a photographer’s archive of high-res images.
Cloud Syncing: Using Online Storage
Cloud syncing involves uploading your files to a cloud service, like Google Drive or Dropbox, and then downloading them to your new NAS. It’s like sending your data on a detour through the sky. This method is handy if you’re moving between two different locations or don’t have both NAS systems in the same place. However, it can be slow and costly for large amounts of data. For example, uploading 1TB might take days and could hit your internet data cap. To streamline this process, you can automate NAS cloud backups and reduce manual steps—especially useful when syncing regularly. Use this if you have a small amount of data or no other options.
Picking the Best Method for You
So, how do you choose? Here’s a quick guide:
- Network Transfer: Best for small to medium data (under 1TB) and a fast, stable network. It’s easy and doesn’t require touching the hardware.
- Direct Drive Connection: Ideal for large data (1TB or more) and if you’re comfortable with tech. It’s fast but needs careful checking for drive compatibility.
- Cloud Syncing: Good for small data or when the NAS systems are in different places. It’s convenient but can be slow and pricey for big transfers.
No matter which method you pick, tools like rsync (for network transfers) or your NAS’s own software can make the process smoother.
Choosing the right transfer method is all about balancing speed, ease, and your comfort level. Network transfer is simple but can be slow for big files. Direct drive connection is fast but requires a bit of tech know-how. Cloud syncing is flexible but best for smaller data sets. Pick the one that fits your situation, and you’ll be on your way to a successful migration.
Ensuring Data Integrity and Structure
Data integrity is like checking that every piece of your puzzle is still there after the move. It ensures that your files, whether they’re family photos, work documents, or music, aren’t damaged or missing when they arrive on the new NAS. One easy way to check this is with something called a checksum. A checksum is a unique code (like a fingerprint) for each file. Before you move the file, you create its checksum, and after the move, you check if it matches. If it does, the file is safe. Many NAS systems have built-in tools to do this for you, or you can use free software like MD5summer on your computer. It’s a small step that gives you big peace of mind.
Preserving Your Folder Structure and Permissions
Your folder structure is how your files are organized, like having a folder for “Family Photos” with subfolders for each year. Permissions are like keys, deciding who can view or edit certain files. When you migrate, you want to keep both the same. Tools like rsync can help. Rsync is a popular program that copies files while preserving the folder hierarchy and permissions. It’s like a careful mover who labels every box and puts it in the right room. If you’re moving to a NAS from the same brand, you might have even easier options. Check your NAS’s manual or support page to see what tools are available.
Handling Differences Between Old and New Systems
Sometimes, your new NAS might use a different file system, which is like a different way of organizing files. For instance, your old NAS might use NTFS, while the new one uses ZFS. This can cause issues, like files not showing up correctly. To fix this, you might need to reformat the drives or use a compatibility tool. Don’t worry, it’s not as tricky as it sounds. Your NAS’s support page or manual will have step-by-step instructions. If you’re unsure, start with a small test transfer. Move a few files first to make sure everything works before you migrate the whole batch.
Quick Tips for a Smooth Migration
- Make a list of your most important folders and check them first after the migration.
- Use built-in tools if you’re staying with the same brand, they often handle everything for you.
- Test a small batch of files before moving everything to catch any issues early.
By taking these steps, you can ensure your data arrives safely and stays organized. It might take a little extra time, but it’s worth it to know your files are in good shape on your new NAS.
Troubleshooting Migration Issues
Moving your files to a new NAS (Network Attached Storage) system is like moving to a new house—sometimes things don’t go exactly as planned. Maybe a box gets lost, or something breaks along the way. But don’t worry! Most problems during data migration are easy to fix if you know what to look for. In this section, we’ll walk you through common issues you might face and how to solve them. We’ll also share some handy tips to help you avoid problems before they start.
Common Problems and Simple Solutions
Here are some of the most common issues people run into when migrating data to a new NAS, along with easy ways to fix them:
-
Slow transfer speeds
If your files are taking forever to move, it’s like traffic jamming up your data highway. Here’s what you can do:- Check your internet connection. A wired connection (using an Ethernet cable) is usually faster than Wi-Fi.
- Try moving smaller groups of files at a time instead of everything at once.
- If you’re using the cloud, remember it can be slow for big files—patience is key!
-
Incomplete transfers
Sometimes, not all files make it to the new NAS, or the transfer stops halfway. It’s like leaving a box behind when you move. To fix this:- Make sure all files are selected for transfer. Double-check your settings.
- Look for error messages on your NAS or computer, they often tell you what went wrong.
- If the transfer stops, try restarting it. Sometimes, a second try does the trick.
-
Permission errors
You might see messages saying you don’t have access to certain files. It’s like trying to open a locked door without the key. Here’s how to unlock it:- Make sure you have the right permissions on both the old and new NAS. You might need to log in as an administrator.
- If you’re using a tool like rsync, check that it’s set to preserve permissions.
- For tricky cases, copy the files to your computer first, then move them to the new NAS.
-
Compatibility issues
Sometimes, the new NAS doesn’t recognize certain file types or folder setups. It’s like trying to plug a square peg into a round hole. To solve this:- Check your new NAS’s manual to see which file formats it supports. You might need to convert some files.
- If folder structures don’t match, try reorganizing them on your computer before transferring.
- Test a few files first to make sure they work on the new system.
-
Network connectivity problems
If your network drops during the transfer, it’s like a bridge collapsing mid-move. To keep things steady:- Make sure your internet is stable. Avoid transferring during peak usage times, like when everyone’s streaming movies.
- Use a direct connection (like plugging both NAS systems into the same router) for a stronger link.
- If Wi-Fi is your only option, sit close to the router or use a signal booster.
General Troubleshooting Tips
Here are some extra tips to help you avoid or fix problems during your migration:
-
Check the logs
Most NAS systems keep a record (called logs) of what happens during transfers. It’s like a diary of your migration. If something goes wrong, check the logs for clues. They often point you to the issue, like a file that didn’t copy or a network hiccup. -
Update your software
Make sure both your old and new NAS have the latest software updates. It’s like making sure your car is tuned up before a long drive. Updates often fix bugs that could cause problems during migration. -
Test with a small batch
Before moving all your files, try transferring a small group first—like a test run. This helps you spot issues early, so you can fix them before the big move. -
Be patient
Data migration can take time, especially with lots of files. It’s like waiting for a cake to bake—you can’t rush it. If things seem stuck, give it a few minutes before trying to fix anything.
By knowing what to look for and how to solve common problems, you can get back on track quickly. Remember, most issues have simple solutions, and with a little patience, you’ll have your files safe and sound on your new NAS.
Final Steps After Migration
Congratulations, you’ve moved your files to your new NAS (Network Attached Storage) system! The hard part is over, but a few quick steps will make sure everything’s set. Think of this like settling into a new house after a move: you need to check your stuff, get organized, and figure out what to do with the old place. Let’s walk through what’s next.
Check Your Files: Make Sure It All Worked
First things first—double-check that your files made it to the new NAS safely. It’s like making sure all your boxes arrived after moving day. Here’s how:
- Count the files: Compare the number of files on your old system to the new one. If they match, you’re off to a good start.
- Test a few files: Open some important ones, like a photo or a work document, to confirm they’re not broken.
If something’s missing, no worries. You can grab it from your backup and try again.
Set Up Your New NAS: Make It Yours
Now, let’s get your new NAS ready to use. This is like unpacking and setting up your new space. Try these steps:
- Add user accounts: If others will use the NAS, give them their own logins. It keeps things tidy and secure.
- Set permissions: Choose who can see or edit certain folders. Maybe “Vacation Pics” is for everyone, but “Taxes” is just for you.
- Turn on extras: Your NAS might have neat features like backups or movie streaming. Poke around the settings and switch on what you like.
Go slow here. A little effort now means smoother days ahead.
Handle Your Old System: What’s the Plan?
What about your old NAS or drives? You’ve got options, like deciding what to do with old furniture after a move:
- Keep it around: Use it as a backup or for extra storage—like a spare room for odds and ends.
- Sell it: If it’s still good, sell it online. Just wipe all your data off first.
- Recycle it: Too old to keep? Drop it at an electronics recycling spot. Don’t trash it, be eco-friendly!
If you’re letting it go, erase everything on it. Think of it like shredding papers before tossing them.
That’s it! Check your files, set up your NAS, deal with the old system, and you’re finished. It’s like locking the door after a long moving day. Now, enjoy your new NAS and all the space it gives you!